Angular 基礎|從 Todo List 認識四種資料綁定
本篇主要在認識四種資料綁定,使用 todoMVC 提供的模板樣式練習。
- 可參考 DEMO / Github,這是合併 TodoList 和 Pomodoro 兩種功能的小專案,透過實作來練習資料綁定。
資料綁定 Data Binding
斯斯有兩種,資料綁定有四種。
下圖出自於 Angular 官網:
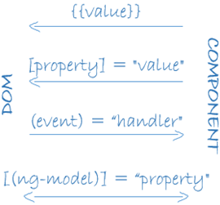
資料綁定(Data Binding)是 Angular 用來協調 Component(TypeScript)與 Template(HTML)互相傳遞資料的機制,依照方向性的不同,可分為四種綁定方式:
- 內嵌綁定/插值(Interpolation)
{{value}}
- 屬性綁定(Property Binding)
[propertyName] = 'value'[attr.attributeName] = 'value'
- 事件綁定(Event Binding)
(eventName) = 'someMethod($event)'(eventName.key) = 'someMethod($event)'
- 雙向綁定(Two-Way Binding)
[(ngModel)] = 'property'
前三種均屬於單向綁定(One-Way Binding);第四種雙向綁定,則是屬性綁定加上事件綁定的組合。
內嵌綁定(插值)
- 單向性:value 改變 HTML 跟著變
- Component 變數→Template 值
- 使用方法:直接在 HTML 中插入變數
{{value}}
以下為範例:
- app.component.html:在 Template 在要嵌入的地方加上
{{雙大括號}}
1 | <h1>{{title}}</h1> |
- app.component.ts:變數 title 一旦改變,會連動更新 HTML h1 的內容
1 | import { Component } from '@angular/core'; |
屬性綁定
- 單向性:value 改變會影響 property,HTML 跟著改變
- Component 變數→Template 值
- 使用方法:在 HTML 中的屬性加上
[property]="value"
以下為範例:
- todo-list.component.ts:新增一個 inputHint 變數
1 | import { Component } from '@angular/core'; |
- todo-list.component.html:變數 inputHint 一旦改變,會連動更新 input 的 placeholder 內容
1 | <input class="todo-input" [placeholder]="inputHint" autofocus> |
結果如下:
根據使用的 property 又分以下幾種,常用於根據綁定 value 布林值決定顯示或移除:
- Emelent property:例如綁定路徑、是否鎖住按鈕等等
1 | <img [src]="imageUrl"> |
- Component property:使用對象為 Component,常用於傳入資料
1 | <hero-detail [hero]="currentHero"></hero-detail> |
- Class property:CSS 類別
1 | <li [class.completed]="todo.done"></li> |
- Attribute property:CSS 屬性
1 | [attr.attributeName] = "statement" |
- Style property:CSS 風格
1 | <button [style.color] = "isValid ? 'green': 'red'">Save</button> |
- Directive property: ngClass 和 ngStyle 是 Angular 提供動態設置 CSS 的方法
1 | <li [ngClass]="{completed: todo.done}"></li> |
事件綁定
- 單向性:一旦觸發指定 event,就會呼叫 TypeScript 中的 someMethod 方法
- Template 發送事件→Component 呼叫方法
- 使用方法:在 HTML 中的加入
(event)="someMethod()"
以下為範例:
- app.component.ts:宣告 onClick() 方法
1 | export class AppComponent { |
- app.component.html:在 HTML 設定 Click 事件,觸發時就會呼叫 TypeScipt 的 onClick 方法
1 | <button (click)="onClick('World')">Click Me!</button> |
結果如下:
雙向綁定:屬性 + 事件
[()] 符號口訣:Banana is in the Box!(香蕉在箱子裡)
- 雙向性:Component 或 Template 其中一方的值改變,另一方也會跟著變
- Component ⇄ Template
- 使用方法:在 HTML 加入
[(ngModel)]語法,使用前需要先在 AppModule 引用 FormsModule - 通常用於
<input>、<textarte>等表單元素
以新增 Todo 功能為例:
- todo-list.component.ts:宣告一個 todos 陣列、變數 todo 和 addTodo() 方法
1 | import { Component } from '@angular/core'; |
- todo-list.component.html:分別在 input 設定 Enter 事件,以及 button 設定 Click 事件,觸發事件時就會呼叫 addTodo() 方法
1 | <input |
使用 [(ngModel)] 語法,要記得在 app.module.ts 引入 FormsModule:
1 | import { NgModule } from '@angular/core'; |
實作:刪除 Todo 功能
在上述範例中,我們完成了新增 Todo 功能,接著要實作刪除 Todo:
- todo-list.component.html
*ngIf: 透過判斷式控制資料顯示與否*ngFor: 透過迴圈顯示多筆資料- 使用內建的 pipe: uppercase 會統一將輸出轉成大寫
- 在 button 元素加上事件綁定 click
1 | <section class="main" *ngIf="todos.length > 0"> |
- todo-list.component.ts:觸發 click 事件時就會呼叫 removeTodo 方法
1 | removeTodo(item): void { |
補充:淺談 NgClass 與 NgStyle
NgClass 與 NgStyle 是 Angular 提供的指令,可用來動態改變 DOM 元素的 CSS,以下和原生屬性與不同綁定方式進行比較:
- Native attributes:靜態使用單一 / 多個樣式
- Class 和 Style Bindings:動態使用單一樣式
- 使用 NgClass 和 NgStyle:動態使用單一 / 多個樣式
1 | <!-- Native Attributes --> |
至於優缺點,以下方程式碼為例:
- 動態使用單一樣式
- 可讀性高
1 | <li [class.completes]="todo.isDoing" |
- 動態使用多種樣式
- 可透過物件形式,一次表達多種樣式
- Angular 8 版本以後,官方推薦直接以 [class] 或 [style] 撰寫,而不使用 [ngClass] 或 [ngStyle]
1 | <li [class]="{completed: todo.isDone, editing: todo.isEditing}" |
兩者可達成相同效果,依照需求和習慣選用即可!
參考資料:
- Angular 4 教學 - Data Binding
- [功能介紹-2] 資料繫結的模版語法
- 精通Angular之NgClass和NgStyle